Help Center
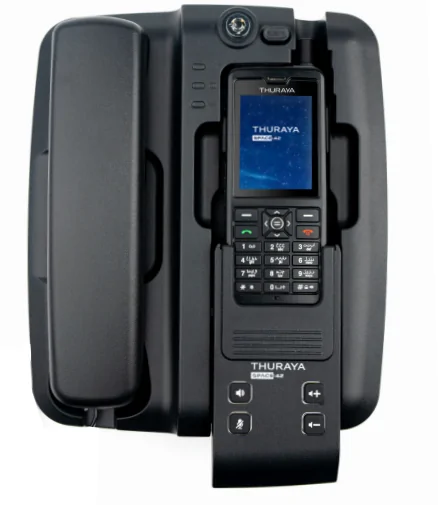
Thuraya FDU-XT NEO (Fixed Docking Unit) User Guide
Table of Contents
- Introduction
- Package Contents
- Installation Instructions
3.1 Antenna Installation
3.2 Satellite Antenna: Mounting & Alignment
3.3 GPS Antenna Installation
3.4 External Accessories - Getting Started
4.1 External Connections
4.2 Connection Interface
4.3 Wall-Mounting the FDU-XT NEO
4.4 Powering Up
4.5 Connecting an Extension Phone
4.6 Connecting a Group 3 Fax Machine
4.7 PC/Laptop Data Connection
4.8 Docking Your Thuraya Handset
4.9 Undocking the Handset - Making & Receiving Voice Calls
- Sending & Receiving Fax Messages
- Data Communications (GmPRS)
- Extension Phone Locking
- Troubleshooting
- LED Status Indicators
- Specifications
1. Introduction
The FDU-XT NEO transforms your Thuraya XT-series handset into a full-featured indoor communication hub, supporting voice, fax, and data over satellite networks.

2. Package Contents
- FDU-XT NEO docking unit with auxiliary handset
- AC/DC power adapter
- Satellite antenna with mounting brackets and 25 m cable
- GPS antenna with 25 m cable
- RJ-11 cable for phone/fax
- USB cable and support CD (drivers + software)
- User’s manual
3. Installation Instructions
3.1 Antenna Installation
Install both satellite and GPS antennas in locations with clear sky views, avoiding obstructions.
3.2 Satellite Antenna: Mounting & Alignment
- Mount on a pole or wall bracket facing the geostationary Thuraya satellite (Thuraya-2 at 44° E for Europe/Africa/Middle East, Thuraya-3 at 98.5° E for Asia/Australia).
- Leave a small cable loop for strain relief, secure excess with cable ties.
- Fine-tune azimuth and elevation using your handset’s GPS-to-SMS alignment service or online tools (e.g., dishpointer.com).
3.3 GPS Antenna Installation
- Place the GPS antenna 0.5–1 m from the satellite antenna.
- Secure with the provided screws, ensure a stable, sky-facing orientation.
- Plug the coaxial connector into the GPS port on the FDU-XT NEO.
3.4 External Accessories
Supported peripherals:
- Analogue extension phones
- Group 3 fax machines (registered with your SIM’s fax service)
- PC/Laptop for data or PC-fax via USB or RS-232
4. Getting Started
4.1 External Connections
Ensure no connection to public PSTN or general telephone lines.
4.2 Connection Interface
Back-panel ports:
- SAT (satellite antenna)
- GPS (GPS antenna)
- EXT (extension phone)
- FAX (Group 3 fax)
- USB / DTE (PC data)
- DC IN (12–34 V DC)
4.3 Wall-Mounting the FDU-XT NEO
- Fix brackets to the wall using recommended screws.
- Hang the unit’s slots onto the brackets.
- Leave ventilation clear around the built-in fan.
4.4 Powering Up
Plug the adapter into DC IN, switch on the rear power rocker. The blue POWER LED will illuminate.
4.5 Connecting an Extension Phone
- Insert one RJ-11 cable end into EXT.
- Plug the other end into your analogue phone.
4.6 Connecting a Group 3 Fax Machine
- Plug RJ-11 cable into FAX.
- Connect to the fax machine’s line port.
- Verify fax service activation on your SIM.
4.7 PC/Laptop Data Connection
- USB: Install drivers from the support CD, then connect.
- Serial (DTE): Use RS-232 cable and COM port settings (Standard 33600 bps).
4.8 Docking Your Thuraya Handset
- Remove antenna caps from the handset.
- Place handset firmly in the cradle.
4.9 Undocking the Handset
Gently lift the handset out of the docking cradle.
5. Making & Receiving Voice Calls
- Use the handset or extension phone.
- Volume, mute, call transfer, and speakerphone functions mirror handset menus.
6. Sending & Receiving Fax Messages
- Fax machine: Choose FAX port, start transmission from your fax unit.
- PC-fax: Launch your software after USB/DTE setup, ring tone on the handset indicates incoming fax.
7. Data Communications (GmPRS)
- Register data services on your SIM.
- Use standard PPP settings in your PC’s dial-up network:
Dial number: >00965 16 XXXXX
Username/password: as provided by service provider.
8. Extension Phone Locking
- Enable/disable via handset menu:
• # OldPIN NewPIN (e.g., # 0000 1234)
9. Troubleshooting
- No SAT lock: Check antenna alignment, clear sky view.
- No power LED: Verify DC IN voltage and fuse.
- Data/fax failures: Confirm SIM registration and cable integrity.
10. LED Status Indicators
- POWER (blue): Unit on
- SAT (green): Satellite signal lock
- GPS (yellow): GPS fix acquired
- DATA (orange): Active data session
11. Specifications
| Parameter | Value |
|---|---|
| Power Input | DC 12 V / 24 V / 34 V |
| Operating Temperature | –10 °C to +55 °C |
| Humidity | 0% – 95% (non-condensing) |
| Dimensions (W×D×H) | 221 × 176 × 62 mm |
| Weight | ~1.2 kg |

